

This Tutorial was written by me on May 5, 2011.Any tutorial similar to this is coincidental and by no means is associated with such tutorial. “ A Moment In Time” was written assuming its followers have working knowledge of PSP and its functions. All supplies used are credited to the artist/copyright owner with a link to their products and no supplies are provided by this site/me. If you follow this tut please give credit to BSD, Broken Sky Dezine, or http://brokenskydezine-gallery.blogspot.com. Either one of the three options are acceptable.
Supplies used for this Tutorial are credited to:
Program: PSP9
Kit: Reminiscence by: Graphics by Pokadot
Tube: A Moment with You By: Zindy Nielsen
Mask: 363 By VixPSP
Font:Script MT Bold
Let’s Play!!!!
Remember: Always add drop shadows to your elements.
(this is a full size kit so the resizing is a bit dramatic compared
to resizing for a tagger sized kits.)
(this is a full size kit so the resizing is a bit dramatic compared
to resizing for a tagger sized kits.)
Open paper10, resize to 500x500, duplicate it and close the original.
Apply your mask and merge layers (group).
Apply frame2 and resize 20%. Use magic wand tool to highlight the inside of the frame. Go to selections>expand>6>ok. Go to selections>invert and paste paper 2 into frame.Press delete on keyboard and deactivate mwt.
Apply doodle9, resize 20%, and place on top of mask layer.
Apply feather element, resize 20%, and place on the bottom right of frame.
Apply key element, resize 20%, and place on top of the feather.
Use deform tool to rotate the key.
Apply bow4 element, resize 10%, and place on top of key(under the loop) Use deform tool to rotate bow to your liking.
Select inside your frame with the magic wand tool. Go to selections>expand>6>ok. Go to selections>invert and apply your tube inside highlighted frame. Press delete on keyboard and deactivate the magic wand tool. Go to layers>new layer group>blend (luminance legacy)>ok.Go to layers>merge layers>merge group.
Open your text box now. type in the name or wording you want on your tag and apply. Place on tag where ever you'd like.
Now add your credits by repeating the previous step.
Go to layers>merge>visible
Your tag is now complete. Save to your pc in jpeg or png and you are done.
Thanks for trying my tutorial!!!
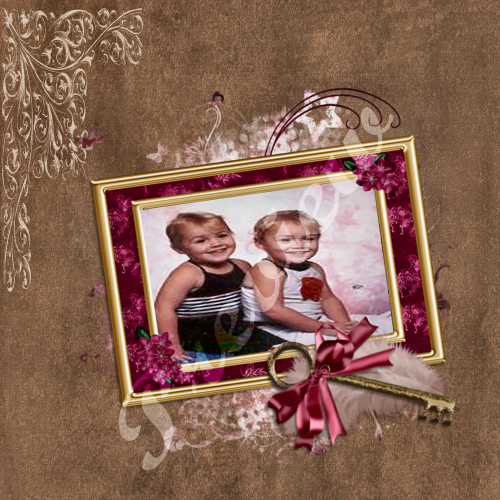
And now... a peek at the matching quick page I made.
This QP was created at 300 dpi and is 3600x3600.Personal Use Only.
If you'd like to have this for scrapping your memories please visit
Graphics by Pokadot for info on where to download it.


No comments:
Post a Comment