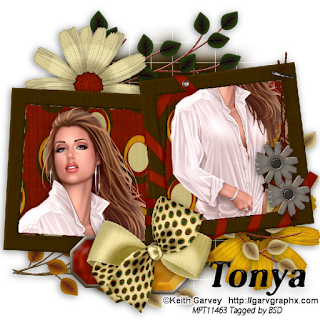
This tutorial was written on December 1,2010 by me and is of my own creative mind. Any other tutorials found to be similar is coincidental. A working knowledge of PSP is required to follow this tutorial.
This tag features Karin of Karin Kreates Scraps PTU kit "Comfy Coffeehouse". You can find this kit at I Got Lucky Skraps in Karin's shop. Also featuring "His Shirt" by the talented Keith Garvey. This tube is PTU and a license is required.
Aside from the kit and tube above, for this tutorial you will need the following supplies:
Mask of Choice: I used WSL #84
Font of choice: I used Kozuka Mincho Pro H
OKAY...Lets Play:
Lets start by opening a blank canvas 600x600. The canvas should be set to transparent.
Open paper #3 and resize to 600x600 then Copy and past paper #3 into your canvas, Go to Layers>load/ save Mask>Load Mask from Disk: Select mask of choice and adjust settings then load your mask. Now merge your layers(layers>Merge>Merge Group).
Add your branches...
Copy and past Leafy Branch #1 to the top center of mask and add a drop shadow, then copy and past both Leafy branches # 5 & 2 and place at the bottom, add drop shadow.
Add your flowers..
Copy and past flower #7 to top left corner, resize 70% and position on top of leaves and add drop shadow. Now add flower #6 to the bottom right corner, resize 70%, position under the leafy branch-sticking out a little and add drop shadow.
Lets add the frame now...
Copy and past frame #7 on top & resize 65%, add drop shadow.
With your magic wand click inside the left side of frame, go to selections>invert and past paper #4 into frame and deselect your magic wand tool. You will now repeat for the right side of frame.
Copy and past beaded string to top left corner of frame and add drop shadow.
Copy and past #2 & 4 brads side by side, slightly overlapping, below your frame add drop shadows. Then copy and past bow #10 on top of brads, add drop shadow.
Okay Now add our Tube..
Using your magic wand tool highlight the inside of frame on left side. go to selections>invert then Copy and past the close up tube into frame,resize 50%. Position tube inside frame using your move tool till it is to your liking then deselect magic wand tool. Add drop shadow to your tube. On the right side of your frame were going to add the full body tube. So,.. highlight the frame using your magic wand tool, go to selections>invert and then past tube inside frame. Position it to your liking with the move tool then deselect your magic wand tool and add drop shadow.
Adding Text...
Using your chosen font add your name (text size of My name is 48, color black) to the bottom right corner of tag and Convert text to raster layer. Go to Effects>Plugins>Eye Candy 5>Glass effect. Play with the settings until you have the desired glass look then apply.
Finally...Add your copyright info and save.
Thank You for trying my tutorial. I'd love to see what you creat with it
tonyaweb@live.com

No comments:
Post a Comment