Saturday, April 2, 2011

Timeless Beauty


This Tutorial was written by me on April 2, 2011. It was written assuming its followers have working knowledge of PSP and its functions. All supplies used are credited to the artist/copyright owner with a link to their products and no supplies are provided by this site/me. If you follow this tut please give credit to BSD, Broken Sky Dezine, or http://brokenskydezine-gallery.blogspot.com. Either one of the three options are acceptable.

Supplies used for this Tutorial are credited to:
Program: PSP9
PTU Kit by: DN Scraps Mothers Love Roses @ Lollipops ‘N Gumdrops
PTU Tube by the lovely Jennifer Janesko (license available @ CDO)
Font: Brush Script Std
Mask: Shady Medusa (If this is your please email me your link for proper credits)

"Thanks Conchi…very beautiful kit!!!"

Let’s Play!!!!
Open paper 15, duplicate it, & close the original.
Apply your mask, merge layer, and resize all layers 500x500.
Apply hourglass element, resize 45%, and place on top and to the left side of mask layer.
Apply lovely frame, resize 30%, & place on tag to the right. Go to selections >expand>5>ok. Go to selections>invert and apply paper folder inside highlighted area.
Keeping the frame highlighted and inverted apply your close up tube (with this tube I just used the head/no close up tube) inside frame, press delete on your keyboard, and blend>screen.
Move frame to top layer.
Apply leaves and resize 30%. Go to Image>flip and move leaves above mask layer hanging out of the bottom right corner of frame.
Apply leaves and resize 30%. Go to Image>mirror and move leaves above mask layer hanging out from the top left corner of frame.
Apply lovely flowers element. Resize 10%, duplicate, and place one on top of bottom right corner and the other on top left corner of frame.
Apply stars shearts2 element and move below the leaves/on top of mask layer.
Apply pearls 2 element, resize 50% and place below frame.
Apply full tube to your canvas, resize 85%, and place in center of tag(on top layer).
Apply your text (Name) using your chosen font, size, and color. In your layers box your text layer, labeled “vector layer” should be highlighted. Right click on it and go to convert to raster layer.
Go to effects>plug ins>Alien skin eye candy5: impact>gradient glow>settings>basic>(choose your settings)>ok.
 Apply your copyright.
Finally…Merge all layer and save to your pc (jpeg or png)
Thank You for trying my tutorial!!!!
Tonya

Thursday, March 31, 2011

Wednesday, March 30, 2011

Gothic Emotions

This Tutorial was written by me on March 30; 2011.Any tutorial similar to this is coincidental and by no means is associated with such tutorial. “Gothic Emotions” was written assuming its followers have working knowledge of PSP and its functions. All supplies used are credited to the artist/copyright owner with a link to their products and no supplies are provided by this site/me. If you follow this tut please give credit to BSD, Broken Sky Dezine, or http://brokenskydezine-gallery.blogspot.com. Either one of the three options are acceptable.

Supplies used for this Tutorial are credited to:
Program: PSP9
Tube copyrighted to: Vinegar
Font: Broken Ghost
Mask by: gh_edgesquares

"Thanks Sarah for letting me work with your awesome kit!!!"

Let’s Play!!!!

Open paper 6, duplicate, close original.
Apply mask and merge group. Resize all layers 500x500.
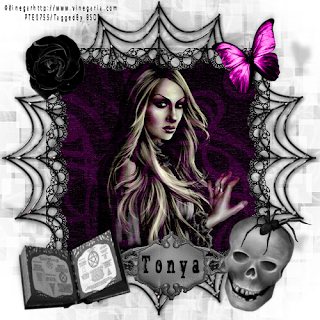
Apply web2 (no resizing)
Apply frame 3, resize 50%, and place in center of mask layer. Select inside your frame with your magic wand tool. Go to layer>invert and apply paper10. Press delete on keyboard and move frame to top layer.
Highlight inside the frame with your magic wand and go to selections>invert and apply your tube. Resize your tube 65%. Go to layer group>blend>hard light>ok.
Apply tag 6, resize 5%, and place on the bottom of frame in the center.
Apply spell book, resize %, and place to the left of tag element.
Apply skull element, resize 50%, and place to the right of tag element. Apply spider element, resize 20%, and place on top of the skull element.
Apply black rose , resize 20%, and place on the upper left corner of the frame element.
Apply the purple butterfly, resize 40%, and place on the upper right corner of frame element.
Apply your text to the tag element using your chosen font.
Apply your copyright info and merge visible.
Save to your PC and you’re finished.

Monday, March 28, 2011

Chocolate Obsessed

This Tutorial was written by me on March 28; 2011.Any tutorial similar to this is coincidental and by no means is associated with such tutorial. “Chocolate Obsessed” was written assuming its followers have working knowledge of PSP and its functions. All supplies used are credited to the artist/copyright owner with a link to their products and no supplies are provided by this site/me. If you follow this tut please give credit to BSD, Broken Sky Dezine, or http://brokenskydezine-gallery.blogspot.com. Either one of the three options are acceptable.

Supplies used for this Tutorial are credited to:
Program: PSP9
Font:Mesquile Std
Mask by: WSL148

"Thanks Karen for letting me work with your beautiful kit!!!"

Let’s Play!!!!
1. Open paper 5 and duplicate it. Close the original.
2. Apply WSL Mask, merge group, and resize all layers 500x500.
3. Apply heart dangle frame element, resize 50%, and move to the upper left corner of tag.
4. Using your magic wand tool highlight inside the brown heart. Go to selections>modify>expand2>ok. Selections>invert. Apply paper14 and press delete on your keyboard.
5.  In the space between the hearts, where they overlap you will need to click inside it with the magic wand tool. Go to selections>modify>expand4>ok. Selections>invert. Apply paper14 again and press delete on your keyboard.
6. Move frame to top in your layers box.
7. Using your magic wand tool highlight inside the white heart. Go to selections>modify>expand2>ok. Selections>invert. Apply paper2 and press delete on your keyboard.
8. Move frame to top in your layers box again.
9. Highlight the inside the brown heart. Go to selections>modify>expand2>ok. Selections>invert.
Apply your close up tube; resize 50%, using the move tool place the tube inside the highlighted area, and hit delete on your keyboard.
Go to layers>new layer group> (blend) luminance legacy>ok. Right click on group layer in layers box and merge group.
10. Repeat step 9 on the white heart on the frame.
11. Move frame in the layers box to top layer.
12. Apply doodle2 element, resize 50%, and move down to just above the mask layer and to the right of the tag. Go to layers>duplicate then go to image>mirror. Move the duplicate doodle element to the left side of tag.
13. Apply full image tube to the top layer of your tag, to the right, and resize 90%.
14. Apply white rose element, resize 20%, and place on the left side of tag just below the frame element.
15. Apply tea-time element resize 20%, and place on the left side of tag half ontop of rose element.
16. Apply the chocolate bar element. Resize 20%, and place below the tea-time element, hanging out the right side a bit.
17. Apply the chocolate delights element.  Resize 20%, and place below the tea-time element, hanging out the left side a bit.
 18. Apply your text (Name) using your chosen font, size, and color. In your layers box your text layer, labeled “vector layer” should be highlighted. Right click on it and go to convert to raster layer.
19. Go to effects>plug ins>Alien skin eye candy5: impact>gradient glow>settings>basic>(choose your settings)>ok.
20. Apply your copyright. Repeat step 18.
 I added gradient glow to my copyright too. Repeat step 19 to do it to yours.
Finally…Merge all layer and save to your pc (jpeg or png)
Thank You for trying my tutorial!!!!
Tonya